I got started with a workshop I took in grad school (it was the highlight of those horrible two years). The workshop was taught by a lovely lady named Jan Wutkowski (link goes to her blog, which includes a schedule of her classes), and most of what I know came from there. The rest came from the primary source book for millinery, From the Neck Up, by Denise Dreher. There are a few tips I have that are from my own experience, too.
Let's begin with a brief overview of how hat making works, for those in the audience who are totally new to the subject. Generally speaking, hats are made from a firm material that will hold its shape (we're skipping over the whole knitted/crocheted thing and going with more traditional methods). This material is usually stretched over a block in order to form it into its final shape, and then embellished. Typically, the foundation material is wool, straw, or buckram (there are others, but these are the most common). If you're using wool or straw, the material is nice enough that you don't need to cover it--you can just sew on whatever feathers and other embellishments you like. Buckram, on the other hand, is ugly, and needs to be covered. On the plus side, it's also cheap, and very stiff--you can get shapes with buckram that you can't with wool. The other thing you need to know is that, although hats come in a million varieties, there's really only two hats. You have (as my teacher said) fitting hats and sitting hats. A fitting hat is one that comes down over your head, like a fedora, or a cloche. A sitting hat is one that just sort of balances up there, like a fascinator.

Fitting hat--actually, the one I made in that workshop.

Sitting hat--easier to model on a real head.
So, now that we know a little more about hats, where do we get what we need? There aren't a lot of suppliers. Hats by Leko is probably the best--nobody else has the selection they do. Judith M also has a decent selection, although I've never ordered from them. Suppliers for theatrical costuming will also carry a limited selection of hat supplies, but if you're just getting started, I'd go with Leko. They're pricey, but they also have everything you could possibly need, as well an excellent supply of buckram frames (I highly recommend covering a few premade ones before you tackle making your own--it can be trickier than you expect).
That said, traditional supplies are expensive. A good hardwood hat block will easily set you back a couple hundred bucks, and you usually want at least a couple. The enterprising do it yourselfer might attempt to make one. This is my favorite example of what can happen when you go that route. I generally wouldn't advise it unless you're an experience woodworker, or have other skills (if time permitted, I'd use the model stock we have at school, and run a couple of hat blocks on the CNC machine). But all is not lost--while I can't save our example person all that time and effort, I can help you with one little link. Frank's Cane and Rush Supply carries sturdy, polyurethane hat blocks for next to nothing (Thank you, Ms. Wutkowski!). I haven't found anywhere else that carries these, and they are great to work with--I have two myself. Depending on what you're doing, you can improvise, too. While felt and straw hoods will require steaming (which means your block needs to be heat resistant), buckram doesn't necessarily have to be heated to be formed. It will shrink a little, but as long as you can pin the fabric to hold its shape while it dries, you can use whatever will fit your needs. In my own first steps to making buckram fascinator frames, I've had remarkably good luck with a styrofoam head from Hobby Lobby. I wouldn't use it for a fitting hat, but for just getting a curve, it's great.


Now you can't make a good buckram frame without millinery wire to hold the shape. Or can you? This has been my most recent avenue of inquiry. For my first two hat frames, I saved some pennies and used memory wire. You'll find it in the beading section of any craft store--it's basically spring steel, so it holds its shape. The memory wire works well for small, round frames, but it has a tendency to warp and curve once you reach a certain size. I soldered the ends together, but you could also using cheap tubing. I don't recommend trying to bind the ends--you'll wind up with a lump, and they might still come apart. Traditional millinery wire is covered with thread or paper, but I question how necessary that really is. As best I've been able to find, steel wire is going to be your best bet, around 20g (#19 is the preferred size, but I'm not entirely sure that's the gauge). Make sure whatever you get won't rust and damage the fabric. My time's been a bit limited so I haven't yet determined the best alternative for larger frames. I will say, florist's wire comes up frequently as an alternative--the important thing is that it will hold whatever shape you put it into.


Styrofoam head in action!
Moving onto materials, unfortunately, you will have to go with a millinery or costume supplier for pretty much every foundation fabric other than buckram. Buckram can be had at some fabric stores, but it's pretty lightweight, and more expensive per yard (but you can buy just one yard, so you don't have to hit the $38 minimum with Leko's). However, if you're just looking for a small quantity to experiment with, it'll work. I picked up a little over a yard at JoAnn's for about $5. I did a couple of tests, and while one layer sorta works, two layers of it gives the stiffness you really need.

Two layers. Trust me on this
Now you can't make a good buckram frame without millinery wire to hold the shape. Or can you? This has been my most recent avenue of inquiry. For my first two hat frames, I saved some pennies and used memory wire. You'll find it in the beading section of any craft store--it's basically spring steel, so it holds its shape. The memory wire works well for small, round frames, but it has a tendency to warp and curve once you reach a certain size. I soldered the ends together, but you could also using cheap tubing. I don't recommend trying to bind the ends--you'll wind up with a lump, and they might still come apart. Traditional millinery wire is covered with thread or paper, but I question how necessary that really is. As best I've been able to find, steel wire is going to be your best bet, around 20g (#19 is the preferred size, but I'm not entirely sure that's the gauge). Make sure whatever you get won't rust and damage the fabric. My time's been a bit limited so I haven't yet determined the best alternative for larger frames. I will say, florist's wire comes up frequently as an alternative--the important thing is that it will hold whatever shape you put it into.

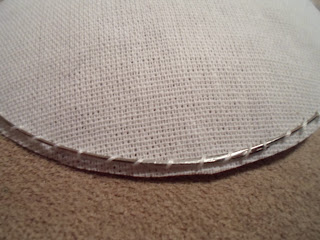
Most of your references will say to sew the wire to the edge of the buckram--I've found it's much easier to sew it onto the curve, them trim it away.

And trim it as close as possible without cutting your stitches.

Here's a close up of the soldered joint--it's a quick and dirty job with an iron, but it's going to be covered anyway.
The last thing you'll need to put together a nice frame (and let's face it, an ugly frame is going to make an ugly hat), is something to cover the wire. A traditional frame will use crinoline--again, something that can be hard to find. I thought about it and thought about it, and you know what I discovered? Single fold bias tape does the job beautifully, and for a fraction of the cost.

I opted for 5/8". Initially, it felt a bit narrow, but it really does make for a nice finished edge.

Tada! Finished frame for a fraction of the cost!
I'm assuming if you're handy enough to get this far, you can do the design work and figure out how to cover and embellish the frame. Hopefully some of that will help if you're looking to get started with hat making on a budget.